How to Build a Tire Cover
I have been making hexagon tire covers for our re-tired garden which we are expanding upwards from fifty tires. Well that's fifty tire planters as each planter uses three tires, two for soil and one as a spacer between the growing plants and the plastic. I use logging truck tires as they are a plentiful resource around here.
 I make it with 1 X 2 pine, and the plastic is 8 mil vapour barrier left over from the shop reconstruction project. I suppose green house plastic would last longer. I decided to use octagons as they will fit the truck tires better than a hexagon. Future experiments will involve plastic conduit - like hula hoops. Theres a formula you can google to decide how big the sides need to be but I opted for a simpler method and just layed it out on a big piece of cardboard which works great as a turntable when assembling the parts. I use a simple jig on a miter saw to make a bunch of pieces that are all consistently the same size.
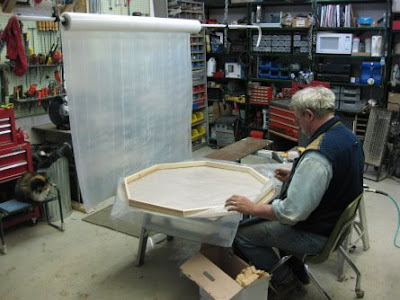
 I just lay a piece of the puzzle down with one side glued and add another section until I close the octagon. I am using wood glue and have found that 9/16 staples, two to a corner hold the thing together enough that I can shoot three 1-1/2 18 gauge pins into each corner: The picture shows the wrong way to place my left hand as I shoot a nail. These things can curl when they hit a knot. Best to place any hands well away from where a nail can inadvertently shoot out..
 In order to keep the light weight lids on the tires I initially used three small fence staples spaced around the perimeter. I have since switched to screws which goes faster and works better out in the garden. I just cut 1/2 inch pieces from old inner tubes and use it to bungee down the lids by looping it over the screw in the lid and ones I screw into the second tire down from the lid. It takes six screws, three in the lid and three in the tires. We get some high winds and it hasn't blown off a cover yet.
 Once the octagon is put together I place a piece of plastic on it and flip the whole thing over so that I can wrap the plastic around the 1 x 2 and staple it down with 1/2 inch staples every two inches or so. Wrapping the plastic helps keep the weather off of the 1x2. On the corners I carefully fold the plastic and secure it with two staples, which help hold the octagons together. Once assembled, with the plastic stapled on, they are surprisingly strong.
 I then trim the plastic away and start another one. A shop cat overseeing the operation and some classical music in the background is a practical necessity.
I have started to monitor the soil temperature under the covers. Yesterday it was 6c (42.80f) outside and 16c (60.80f)two inches down from the surface. A couple of more days the soil temperature should be getting close to ideal which is around room temperature or just a bit cooler. I use this site as a guide.
It is amazing how using covered tires expands our very short growing season. In effect I have all my garden growing in cold frames. Once it gets a little warmer, well ok, a lot warmer, after the plants are a foot high I will remove the covers during the day. I also line the top tire, which doesn't contain any soil, with aluminum foil to reflect light onto the plants. Thanks to an ex dope growing buddy for that tip. Another idea is simply to paint the inside of the tire white. But the tin foil is far more reflective.
Come on give it a try. Grow a turnip, or Spud, or whatever for food freedom.
You know you want to...
 I make it with 1 X 2 pine, and the plastic is 8 mil vapour barrier left over from the shop reconstruction project. I suppose green house plastic would last longer. I decided to use octagons as they will fit the truck tires better than a hexagon. Future experiments will involve plastic conduit - like hula hoops. Theres a formula you can google to decide how big the sides need to be but I opted for a simpler method and just layed it out on a big piece of cardboard which works great as a turntable when assembling the parts. I use a simple jig on a miter saw to make a bunch of pieces that are all consistently the same size.
 I just lay a piece of the puzzle down with one side glued and add another section until I close the octagon. I am using wood glue and have found that 9/16 staples, two to a corner hold the thing together enough that I can shoot three 1-1/2 18 gauge pins into each corner: The picture shows the wrong way to place my left hand as I shoot a nail. These things can curl when they hit a knot. Best to place any hands well away from where a nail can inadvertently shoot out..
 In order to keep the light weight lids on the tires I initially used three small fence staples spaced around the perimeter. I have since switched to screws which goes faster and works better out in the garden. I just cut 1/2 inch pieces from old inner tubes and use it to bungee down the lids by looping it over the screw in the lid and ones I screw into the second tire down from the lid. It takes six screws, three in the lid and three in the tires. We get some high winds and it hasn't blown off a cover yet.
 Once the octagon is put together I place a piece of plastic on it and flip the whole thing over so that I can wrap the plastic around the 1 x 2 and staple it down with 1/2 inch staples every two inches or so. Wrapping the plastic helps keep the weather off of the 1x2. On the corners I carefully fold the plastic and secure it with two staples, which help hold the octagons together. Once assembled, with the plastic stapled on, they are surprisingly strong.
 I then trim the plastic away and start another one. A shop cat overseeing the operation and some classical music in the background is a practical necessity.
I have started to monitor the soil temperature under the covers. Yesterday it was 6c (42.80f) outside and 16c (60.80f)two inches down from the surface. A couple of more days the soil temperature should be getting close to ideal which is around room temperature or just a bit cooler. I use this site as a guide.
It is amazing how using covered tires expands our very short growing season. In effect I have all my garden growing in cold frames. Once it gets a little warmer, well ok, a lot warmer, after the plants are a foot high I will remove the covers during the day. I also line the top tire, which doesn't contain any soil, with aluminum foil to reflect light onto the plants. Thanks to an ex dope growing buddy for that tip. Another idea is simply to paint the inside of the tire white. But the tin foil is far more reflective.
Come on give it a try. Grow a turnip, or Spud, or whatever for food freedom.
You know you want to...


Comments